[Rails 6 Series] Deploying to AWS
Posts in Series
- Rails 6 Series - Starting Rails 6 with Vue on AWS
- Rails 6 Series - Setting up AWS resources
- Rails 6 Series - Deploying to AWS
- Rails 6 Series - Configuring Vue and Webpack
Overview
Now that we have our empty Rails project and created our Elastic Beanstalk environment, we are ready to add our configuration scripts so that we may deploy our application.
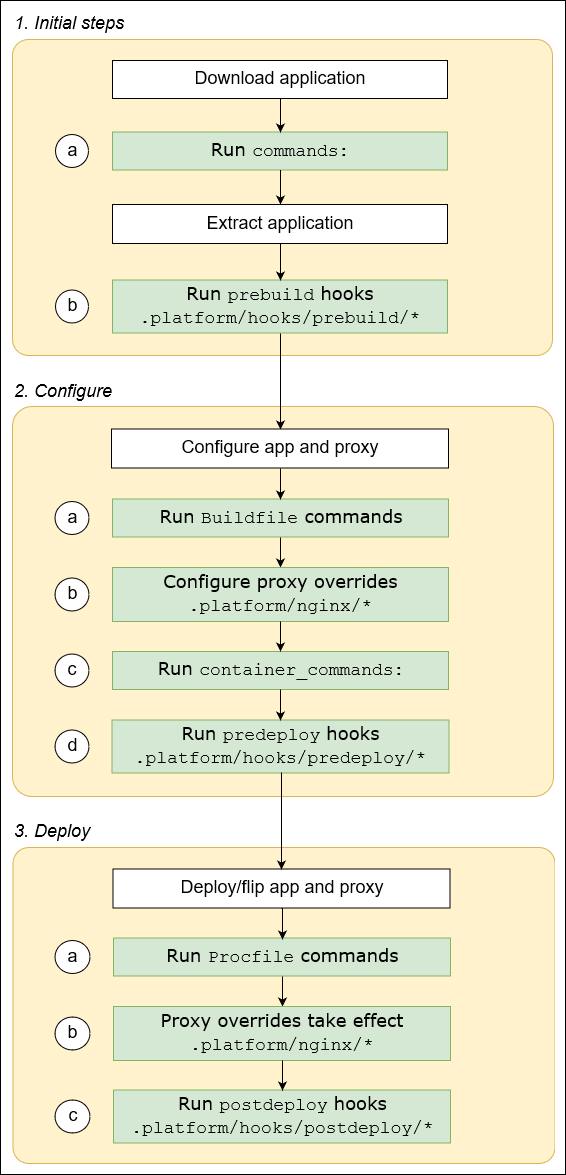
Beanstalk Platform Hooks
The latest beanstalk environment uses Amazon Linux 2 which no longer supports beanstalk extensions (ebextensions). Instead it introduces Platform Hooks. This allows us to create configuration files and setup scripts that will run on the EC2 hosts during the various build and deployment stages. AWS has a nice graph that shows the new platform hook process.
Nginx Setup
By default webpack generated content will not be served by Nginx. We need to add an Nginx config file to our beanstalk environment that will add the packs directory to Nginx. Elastic Beanstalk has a default nginx.conf file that loads all files within the conf.d/elasticbeanstalk folder. With Amazon Linux 2, we will leverage platform hooks.
Create a new folder .platform in the root directory of our Rails application. Within there, create a file in the following path .platform/nginx/conf.d/elasticbeanstalk/webpack.conf
# .platform/nginx/conf.d/elasticbeanstalk/webpack.conf

location /packs {
    alias /var/app/current/public/packs;
    gzip_static on;
    gzip on;
    expires max;
    add_header Cache-Control public;
}
With the above, whenever we deploy our application or an instance gets replaced, nginx will always automatically be configured to serve everything within the packs directory.
Yarn and Node Setup
As we did with the nginx configuration, we can install Yarn and Node JS automatically onto our EC2 hosts when beanstalk deploys the application. Both are requirements for using webpack and we will use platform hooks for this. Create a new file within the prebuild hooks folder .platform/hooks/prebuild/01_install_yarn.sh. Make sure that this file has executable permissions chmod +x 01_install_yarn.sh.
Database Setup
The next step is to configure our application to connect to our database in production. For this we will use both environment variables and Rails encrypted credentials.
Rails 6 Master Key
We need to let our beanstalk application have access to the master key to decrypt the credentials. In order to do this we need to go into our application and fetch the encryption key.
$ cd config
$ cat master.key
<copy this key>
As an aside, do not commit the config/master.key file!! It has already been added to the .gitignore file when we ran rails new.
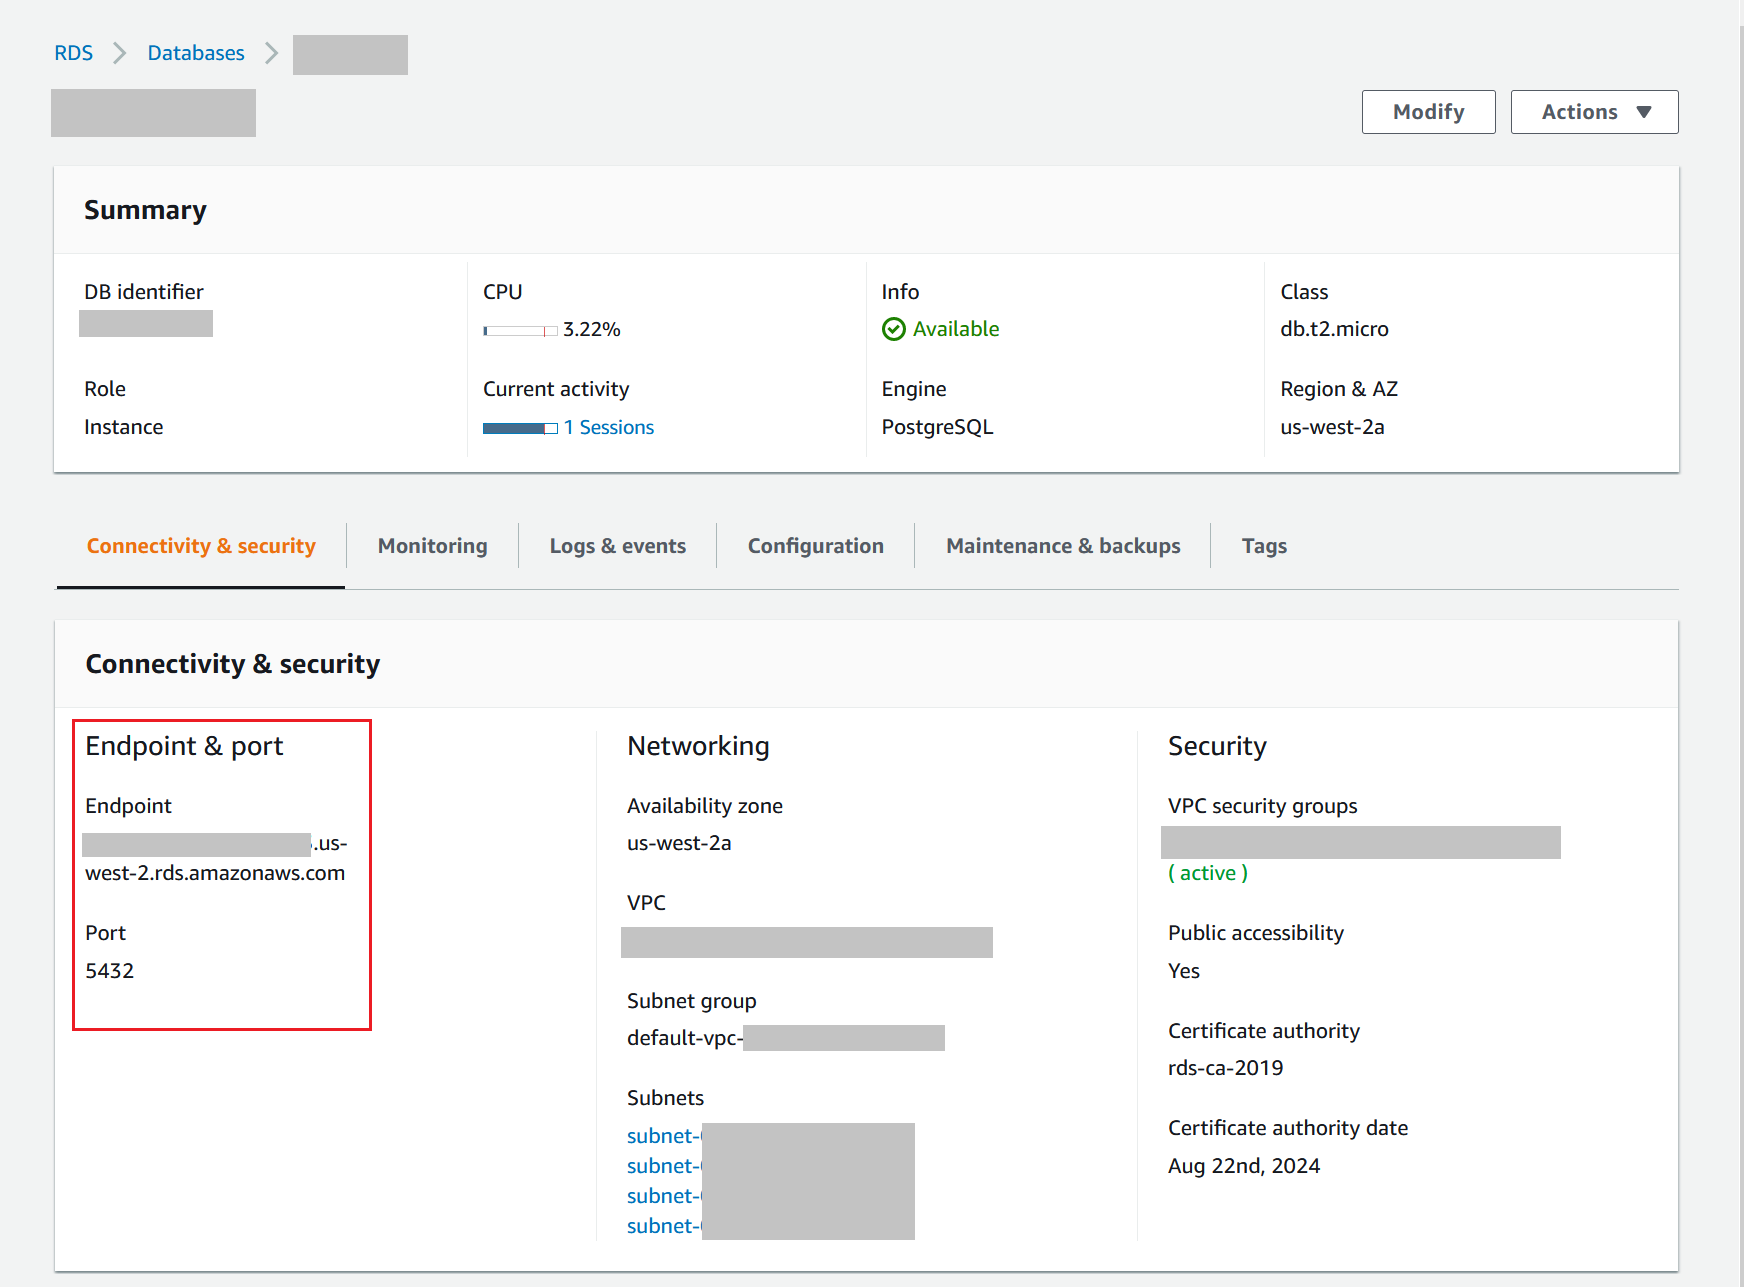
RDS Connection Details
The next piece of information we need is our database name and database endpoint. Log into the AWS console and go to the RDS page. Select your application database where you will find the connection details under the Connectivity & security tab.
Beanstalk Environment Variables
- From the AWS console, head over to the beanstalk configuration page for your environment
- Go to the
Softwaresection configuration and hitEdit - Create 3 new environment variables with the values we fetched earlier
- Database Name
- Database Endpoint
- Master Key

Encrypted Credentials
To store the username and password for connecting to our RDS instance, we will be using Rails encrypted credentials. The file is located in config/credentials.yml.enc. We will not be able to open the file without decrypting it first, for which there is a rails command available.
EDITOR="vim" rails credentials:editThis will open up the file for editing and saving. The format of this file is just simple YAML. While we have this open we will add a few things to it.
Saving this file will encrypt it before saving it back to disk. WIth that in place we need to make a few adjustments. Open config/environments/production.rb and set config.require_master_key = true to make sure that the application checks for the master key during start up.
After that is done, accessing the values is super simple. From anywhere in our application we can access the yaml structure.
Rails.application.credentials.production.database_username # => will return usernameDatabase.yml
With our connection details entered in both the environment variables and encrypted credentials, the last step is to update our config/database.yml file.
Deply to AWS
In the previous post we created our necessary AWS resources and in this post we created our initialization scripts. The last step we need to do is hook it to beanstalk and deploy it! Make sure you have committed all the files we created and edited locally.
- Ensure that you have
ebinstalled so that we can initialize our application - From your project root run
eb init - The command will ask you which region you want to use, select the one we created our beanstalk environment
- Next select which platform to use. Select the one that has
Ruby 2.7 (Puma) - Select
nowhen it prompts forsshandCodeCommit - Run
eb statusto make sure everything is hooked up, you should seeStatus: Ready - Run
eb deployand wait for it to deploy to your environment before visiting the page!
Conclusion
With the past few posts we installed our prerequisites, setup our AWS resources and beanstalk environment, and lastly configured our application to install our dependencies within EC2 and serve webpack content through Nginx. At this point your application should be up and running on AWS managed completely through beanstalk.
Any further changes to your application can be done locally, saved via git, and deployed via eb deploy. This will allow fast development cadence and remove the operational burden of maintaining a stack on AWS!
The next post will go over actually using Vue with webpack now that our stack is deployable. We will import Vue, configure it, and lastly configure webpack so that we can create multiple packs
The next post will go over actually using Vue with webpack now that our application can be deployed. We will import Vue, configure both Vue and Webpack, and learn how to migrate from using the Asset Pipeline to creating packs instead.
Rails 6 Series
- Rails 6 Series - Starting Rails 6 with Vue on AWS
- Rails 6 Series - Setting up AWS resources
- Rails 6 Series - Deploying to AWS
- Rails 6 Series - Configuring Vue and Webpack